Installing the Zeus Load Balancer Software
Before you begin...
Before setting up the Zeus Load Balancer, please ensure that the
network on which the cluster is to run is configured
correctly. Otherwise, the adminserver may not be able to contact all
the machines in the cluster, which will cause problems when it comes
to configuring them! Likewise, it is essential that the Balancer can
contact all of the backends, else they will be marked as dead on the
adminserver.
Note that the following instructions often refer to $ZEUSHOME. As you will be installing onto many different machines, please check that you use the right value for $ZEUSHOME in each case!
Stage 1: The Adminserver
With a properly configured Zeus Administration Web Server, almost all
administration of the Zeus Load Balancer and the cluster of webservers
that it controls can be performed with a powerful, easy-to-use
web-based interface.
Since you're reading this web-based documentation, we'll assume you've set up the adminserver correctly!
Stage 2: The Back-end Webservers
If you are not using Zeus Webserver software, please skip this stage!
Also, be sure to read the documentation about running the Balancer
with non-Zeus webservers - some default configuration options must be
changed, else the Balancer will not function correctly.
Software installation
On each back-end machine, install the Zeus Webserver software. This time choose option 3, 'Clustered install of webserver' when running zinstall. In the following instructions, replace '$ZEUSHOME' with the actual location where you installed the webserver.
When zinstall has completed, a message is presented that says 'Remember to register <hostname>:<port> with the adminserver'.
At this stage, log in to the adminserver from your web-browser, then click on the web icon, then click on the 'clustering' button, which will display the cluster status page. Next, click on the Configuration button. On the form that is now displayed, in the 'back-end machine section', insert the "<hostname>:<port>" information the zinstall process displayed, and click on 'Add'.
This registers the back-end machine with the adminserver.
You need to copy the communication key file from the Adminserver installation onto the back-end webserver machine. The communication key file is a secret key that is used to secure the communication between the Adminserver and webservers across the network.
From the Adminserver machine, copy the file $ZEUSHOME/webadmin/conf/commkey onto the webserver machine in the location $ZEUSHOME/web/etc/commkey. The file should have permissions 0400 (and owned by root if you installed as root).
Next, the back-end webserver needs configuring to put it in 'clustering mode' so it knows it is part of a larger cluster of machines. This can be done simply using these shell commands:
The single quotes '', and the twin '>>' are important! The back-end machine will then listen on port 10080, which are routed from port 80 on the front-ends. If the front-ends listen on port 81, the back-end machines in a cluster will listen on port 10081, etc. This is to enable the use of the load balancer and a backend webserver on the same machine (helpful for testing a setup, but not advisable in a real-life setup).cd $ZEUSHOME echo 'balancer!enabled yes' >> web/global.cfg
Start the webserver by running the $ZEUSHOME/start-zeus script. Some copyright and other information messages will appear. If for some reason, startup is not possible, you will see a line starting with FATAL: and the reason why. See the section on Startup and Error logging below.
Repeat steps 1 - 4 for each back-end machine.
Configuring the Admin Server
Re-visit the cluster status page on the Adminserver, which should now show a diagram that looks something like the following picture:
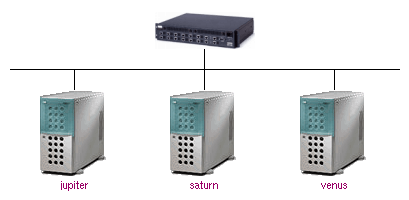
All of the machines displayed should not be coloured red. If they are that signifies that either:
- The machine is dead.
- The wrong <hostname>:<port> was entered on the configuration form.
- The webserver isn't running on the the back-end machine (was $ZEUSHOME/start-zeus run?) or you forgot to turn on clustering mode (see above)
Stage 3: The Front-end Machines
On each front-end machine, install the Zeus Balancer software -
Run the ./zinstall script.
You will need to copy the communication key file from the Adminserver to the front-end machine as before. Copy the file $ZEUSHOME/webadmin/conf/commkey from the Adminserver machine to $ZEUSHOME/balancer/etc/commkey on the front-end machine, with permissions/ownership 0400/root.
You will also need to copy from the Adminserver the $ZEUSHOME/webadmin/conf/hosts file. This is a simple text file that contains information on the back-end webservers that are in the system. The front-end machines need to know this information so they know which back-end machines are available to them to send their requests to. Copy the file $ZEUSHOME/webadmin/conf/hosts from the admin machine to $ZEUSHOME/balancer/workers on the front-end machines.
You will need to run the $ZEUSHOME/balancer/bin/configure-flipper configuration script, to configure front-end failover. This will generate a configuration file, 'flipper.cfg', in the current directory based on the information you specify about the network configuration. If you have multihomed machines, please enter the details of all the IP addresses and interfaces for each machine.
Each front-end machine needs to know the network configuration of the other front-end machine so that if one of the fails, the other front-end machine take seamlessly take over the work that it was doing.
An example: A website www.cluster.zeus.co.uk has two frontend machines, cobalt and cobalt2. www.cluster.zeus.co.uk points to two DNS address records, 192.168.0.100 and 192.168.0.101. cobalt has IP address 192.168.0.2. cobalt2 has IP address 192.168.0.3 For example, if there are two frontend machines for the website www.cluster.zeus.co.uk, the configuration would be as follows:
Note that the interface names will depend on the operating system used on the frontend machines - check your OS documentation to find out what names should be used. The file generated is identical for each front-end machine, and it should be copied to both front-end machines as $ZEUSHOME/balancer/flipper.cfgHostname of the first front-end box: cobalt Hostname of the second front-end box: cobalt2 Back-end IP address for cobalt (monitored by cobalt2): 192.168.0.2 Back-end IP address for cobalt2 (monitored by cobalt): 192.168.0.3 Front-end IP address for cobalt: 192.168.0.100 Netmask for 192.168.0.100 [255.255.255.0]: Broadcast address for 192.168.0.100 [192.168.0.255]: Which interface uses 192.168.0.100 [eth0]: Please give this network a name: network-1 (NOTE: the name chosen is unimportant) Front-end IP address for cobalt [no more]: Front-end IP address for cobalt2: 192.168.0.101 Netmask for 192.168.0.101 [255.255.255.0]: Broadcast address for 192.168.0.101 [192.168.0.255]: Which interface uses 192.168.0.101 [eth0]: Please give this network a name: network-2 Front-end IP address for cobalt2 [no more]: Takeover cobalt2's network network-1 on which of cobalt's interfaces: eth0:1 Takeover cobalt's network network-2 on which of cobalt2's interfaces: eth0:1
Start up the Balancer software by running $ZEUSHOME/start-zeus Some copyright and other information messages will appear. If for some reason, startup is not possible, you will see a line starting with FATAL: and the reason why. See the section on Startup and Error logging below.
Finally, go to the Adminserver and revisit the cluster configuration form. Now you must register the frontend machines with the Admin Server, just as with the backend macines. This time insert the <hostname>:<port> details in the section of the form dealing with front-end machines.
Repeat steps 1, 2 and 4 for each front-end machine.
Back to the Admin Server
Re-visit the cluster status page on the Adminserver, and the diagram should be updated to look similar to:
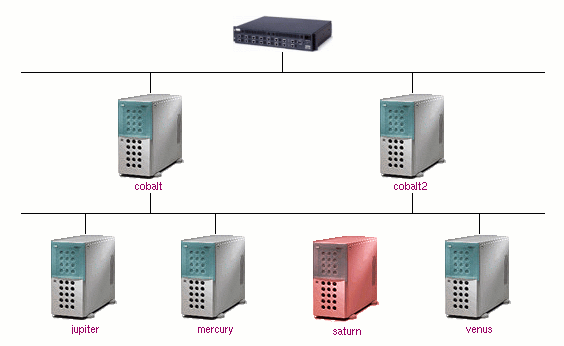
I.e. it now displays the icons for front-end load-balancer machines. The front-end machine icons should not be coloured red, unless:
- The machine is dead.
- The wrong <hostname>:<port> was entered on the configuration form.
- The balancer isn't running on the the front-end machine (was $ZEUSHOME/start-zeus run?).
Click on an icon to find out more information about a particular server's status.
Startup and error logging
The front-end machines keep a logfile for errors and other
information. It is worth looking at these files to make sure that the
installation is running correctly. When the load-balancer (zeus.lb)
process starts up, it will normally log in the file
$ZEUSHOME/balancer/log/errors something like the following:
If there is a serious network outage, the load-balancers may fail to contact any of the back-end servers, and a message will be logged:INFO:Adding back-end worker saturn.cluster.zeus.co.uk/192.168.0.5 INFO:Adding back-end worker jupiter.cluster.zeus.co.uk/192.168.0.4 INFO:Adding back-end worker venus.cluster.zeus.co.uk/192.168.0.3 INFO:Adding back-end worker mercury.cluster.zeus.co.uk/192.168.0.2 INFO:Zeus Balancer running
The $ZEUSHOME/balancer/log/flipper file logs messages from the IP takeover process (zeus.flipper), which monitors the other front-end, in a twin front-end load balancing setup. On startup, information similar to the following will be logged:SERIOUS:No back-end servers responding
If the other front-end machine fails to respond to the ping (ICMP) heartbeat packets that the flipper process sends, the IP address of the failed machine will be taken over by running the $ZEUSHOME/balancer/bin/takeover script, and a log message similar to below will be logged:INFO:Flipper started INFO:Monitoring IP address : 10.0.0.7 INFO:On remote failure, takeover cobalt.cam.zeus.co.uk's IP-addresses INFO:Takeover network : c1.net INFO: IP address : 192.168.0.100 INFO: on interface : eth0:1 INFO: interface mac address : 00:10:E0:00:42:DB
WARN:Unable to contact 10.0.0.7, ping: read timeout
SYSTEM: ifconfig eth0:1 192.168.0.100 netmask 255.255.255.0 \
     broadcast 192.168.0.255 && route add -host 192.168.0.100 lo
These commands might vary depending on the architecture Zeus Balancer is installed on, but they will be the system commands for configuring interfaces and changing the routing table for the machine.INFO:Running release SYSTEM: ifconfig eth0:1 down && route del -host 192.168.0.100
Stage 4: Adding websites
Now you have a fully working and configured cluster. This is a good
time to remember to add a '/usr/local/zeus/start-zeus' to the
rc.d/ files of each machine in the server farm to ensure if
they are rebooted they we resume their appropriate role in the server
farm.
You are now ready to start adding and configuring websites. This is done via the Adminserver in exactly the same fashion as when using Zeus Server in single machine mode. Simply click on the 'Add Server' button, configure the virtual server as desired, and click on the traffic light to start the server. The Adminserver will now deploy the configuration changes across the server farm, on both the back-end and front-end machines.
For the front-end balancer, the DNS address given for the virtual server name should resolve to two IP-address, one for each of the external IP-addresses of the front-end machines. When a front-end machine is asked to start a website, it resolves the DNS address of the website into a list of IP-addresses, and attempts to find at least 1 IP-address that it can bind to successfully. If a front-end machine cannot bind to a single IP-address the DNS name resolves to, that front-end will be unable to start that particular virtual server.
The Adminserver Clustering Status page can be re-loaded to show the status of the server farm, at any time. Clicking on any machine in the diagram gives 'drill-down' information about that machine in the cluster. Clicking on a front-end icon will give real-time information about response times and percentage share of all back-end servers.
Clicking on a back-end machines gives a real-time display of current throughput. Use the activity monitor button to display throughput graphs over the last 24 hours / 7 days across the cluster.