Deployment of MongoDB
In this section we explain how to deploy MongoDB. We are going to explain two scenarios: a simple installation that can be useful to test it and a production environment
Note: In MongoDB the databases and tables are created automatically
Note1: MongoDB is case sensitive
Simple
Install MongoDB on RHEL
- For all 64-bit RPM-based distros with yum, put this at /etc/yum.repos.d/10gen.repo:
[10gen]
name=10gen Repository
baseurl=http://downloads-distro.mongodb.org/repo/redhat/os/x86_64
gpgcheck=0
- Install MongoDB
sudo yum install mongo-*
- Create DB directory
sudo mkdir -p /data/db/
sudo chown `id -u` /data/db     #The owner must be the user that is going to execute mongodb server
- Run MongoDB
mongod --port 23000 --dbpath /data/db/ --fork --logpath=/data/db/mongo.log
- You need to rebuild spider monkey If you get an error like this:
warning: some regex utf8 things will not work. pcre build doesn't have --enable-unicode-properties
- Rebuilding spider monkey from RHEL (http://www.mongodb.org/display/DOCS/Building+Spider+Monkey) It doesn't work to me, we need to find other way to do it. However, MongoDB works.
sudo yum erase xulrunner
sudo yum install curl
curl -O ftp://ftp.mozilla.org/pub/mozilla.org/js/js-1.7.0.tar.gz
tar zxvf js-1.7.0.tar.gz
cd js/src
export CFLAGS="-DJS_C_STRINGS_ARE_UTF8"
make -f Makefile.ref
JS_DIST=/usr make -f Makefile.ref export
Install MongoDB on Ubuntu 10.10
- Add a line to your /etc/apt/sources.list
deb http://downloads.mongodb.org/distros/ubuntu 10.10 10gen
- Install MongoDB
sudo apt-key adv --keyserver keyserver.ubuntu.com --recv 7F0CEB10
sudo apt-get update
sudo apt-get install mongodb-stable
- Create DB directory
sudo mkdir -p /data/db/
sudo chown `id -u` /data/db
- Run MongoDB
mongod --port 23000 --dbpath /data/db/ --fork --logpath=/data/db/mongo.log
Install MongoDB on MacOSX
Via homebrew (http://www.mongodb.org/display/DOCS/Quickstart+OS+X)
- Install homebrew if you have not yet done
ruby -e "$(curl -fsSLk https://gist.github.com/raw/323731/install_homebrew.rb)"
- Install mongodb via homebrew
brew update
brew install mongodb
- Create DB directory
sudo mkdir -p /data/db/
sudo chown `id -u` /data/db
- Run MongoDB
/usr/local/Cellar/mongodb/1.6.5-x86_64/bin/mongod --port 23000 --dbpath /data/db/ --fork --logpath=/data/db/mongo.log
- Work with client by executing mongo localhost:23000 in a different terminal
db.foo.save ( {a:1} )
db.foo.find ()
- In case you use macports, replace two first steps with
sudo port install mongodb
Production Infrastructure
Initial Notes
- http://www.mongodb.org/display/DOCS/Production+Notes
- All the deployment will be done using a normal user, for example mongoadmin.
- MongoDB 1.6.5 cannot use user authentication and sharding/replica sets. This means that any user can modify any data stored in MongoDB (that is why the previous note is very important)
- MongoDB has to be in a TRUSTED AREA, which means that it is needed to filter the connections to the MongoDB ports using the firewall.
- Due to the lack of security we have to provide a web interface to the users and avoid that they get logged in any machine with mongo running on it.
- Since MongoDB 1.7.5 we can use authentication and replica sets (http://www.mongodb.org/display/DOCS/Replica+Set+Authentication). TODO: test this feature and include the functionality in the our code
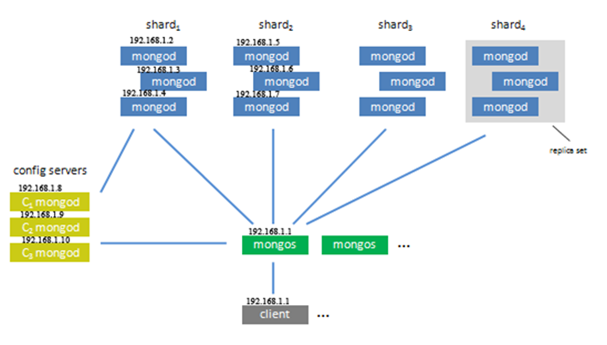
Figure 1. MongoDB architecture
Architecture Notes
- Yellow boxes are VERY important. It contains all the configuration of the MongoDB deployment. If a config server falls down, you cannot add new shards to the infrastructure, but you can read and write data in the databases.
- Green boxes are the schedulers. You can have all you want and it will be the client’s access point. The client can be in the same machine or in other.
- Blue boxes are the machines where the DB data is going to be stored.
- A Replica Set is typically composed by three blue boxes that will contain the same data. It will have a primary that create the ReplicaSet. If this primary falls, it will be elected other primary among the other blue boxes.
- A Shard is a part of the database from the physical perspective. Each Replica Set will be a Shard. Thus, it is used to distribute a DB data among different Replica Sets.
Ubuntu 10.10 server x64
Deployment Procedure
- Get the binaries and copy into the system (to be done in all machines)
$   wget http://fastdl.mongodb.org/linux/mongodb-linux-x86_64-1.6.5.tgz
$   tar vxfz mongodb-linux-x86_64-1.6.5.tgz
$   cp mongodb-linux-x86_64-1.6.5/bin/* /usr/bin
- To do in each of the BLUE machines (see Figure 1)
$   sudo mkdir -p /data/db/
$   sudo chown `id -u` /data/db
$   mkdir /data/db/images
- To do in Blue machines of Replica Set 1 or Shard1 (192.168.1.2, 192.168.1.3, 192.168.1.4)
$ mongod --shardsvr --dbpath /data/db/images --port 10000 --replSet shard1 --fork --logpath /var/log/mongodb.log --logappend
- To do in Blue machines of Replica Set 2 or Shard2 (192.168.1.5, 192.168.1.6, 192.168.1.7)
$ mongod --shardsvr --dbpath /data/db/images --port 10000 --replSet shard2 --fork --logpath /var/log/mongodb.log --logappend
- NOTE: to enable REST API use the parameter –rest when execute mongod
- Configure the Replica Sets. To do in only in the primary blue machine of each replicaSet. In this case, it will be 192.168.1.2 for Shard1 and 192.168.1.3 for Shard2
1. In 192.168.1.2 blue box
$ mongo localhost:10000/admin
2. Type each line of the following separately. The “…” will be added by the MongoDB shell automatically.
config = {_id: 'shard1', members: [
... {_id: 0, host: '192.168.1.2:10000'},
... {_id: 1, host: '192.168.1.3:10000'},
... {_id: 2, host: '192.168.1.4:10000'}]
... }
3.Initiate Replica Set:
rs.initiate(config)
4.View the status
rs.status()
5.In 192.168.1.5 blue box you have to repeat the steps from 1 – 4. The only difference is that you have to use the IP addresses of this Replica Set.
6.To leave Ctrl^D or type exit
- Configure Config Servers (yellow boxes).To do in each config server.
$   sudo mkdir -p /data/db/
$   sudo chown `id -u` /data/db
$   mkdir /data/db/config
$   mongod --configsvr --dbpath /data/db/config --port 20000 --fork --logpath /var/log/mongodb.log –-logappend
- Configure Mongos, that is the dispatcher (green box). We have to indicate where the config servers are. Actually, it is not needed specify all because it will discover, but it is recommending at least a couple of them just in case.
$ mongos --configdb 192.168.1.8:20000,192.168.1.9:20000,192.168.1.10:20000 --port 23000 --fork --logpath /var/log/mongodb.log –-logappend
- Now we are going to create the Shards. If you have several green boxes, you only have to do once, because this info is stored in the config servers (yellow boxes)
$ mongo localhost:23000/admin
- Type:
db.runCommand({addshard : "shard1/192.168.1.2:10000,192.168.1.3:10000,192.168.1.4:10000"})
-
The output should be
{ "shardAdded" : "shard1", "ok" : 1 }
- Type:
db.runCommand({addshard : " shard2/192.168.1.5:10000,192.168.1.6:10000,192.168.1.7:10000"})
- The output should be
{ "shardAdded" : "shard2", "ok" : 1 }
- Enable Sharding in the database, it will be called “test”. We are going to shard the GridFS files stored in this database and a collection called data.
- To shard a collection type:
use admin
db.runCommand( { enablesharding : "test" } );
db.runCommand( { shardcollection : "test.data" , key : { num : 1 } } )
- To shard the GridFS files type:
db.runCommand( { shardcollection : "test.fs.chunks" , key : { files_id : 1 } } )
-
To get info type:
db.runCommand( {listshards : 1} )
db.printShardingStatus()
Adding a New Shard in a Deployed Infrastructure
- Create the Replica Set (assume that the machines are 192.168.1.11, 192.168.1.12, 192.168.1.13). So, in each machine execute this:
$   sudo mkdir -p /data/db/
$   sudo chown `id -u` /data/db
$   mkdir /data/db/images
$   mongod --shardsvr --dbpath /data/db/images --port 10000 --replSet shard3 --fork --logpath /var/log/mongodb.log –logappend
- Configure Replica Set in the primary that could be 192.168.1.11
- In a machine with the dispatcher Mongos (green box):
$ mongo localhost:23000/admin
- Type:
db.runCommand({addshard : "shard3/192.168.1.11:10000,192.168.1.12:10000,192.168.1.13:10000"})