Using OpenStack Havana on Hotel
Overview
OpenStack is an Infrastructure as a Service (IaaS) platform that allows you to create and manage virtual environments. Currently, OpenStack version 2013.2 (Havana) is available on Hotel.An important note is that the OpenStack install on Hotel uses the KVM virtualization technology, so any virtual machines you upload must be compatible with KVM.
This tutorial provide basic information about how to use the OpenStack web interface and provides some information specific to using OpenStack on Hotel.
Please note that OpenStack Havana is also available on India. Other Openstack instalations are avalable on Sierra and Alamo. To find out more, please visit the documentation in our main manual at http://manual.futuregrid.org/openstackhavana.html
Web Interface (Horizon)
An easy way to use OpenStack on Hotel is via the OpenStack web interface on Hotel. You login to the web interface using your FutureGrid username and password. If you change your FutureGrid password in the portal, that change will propagate to the OpenStack interface on Hotel in less than an hour.The initial login page appears as:
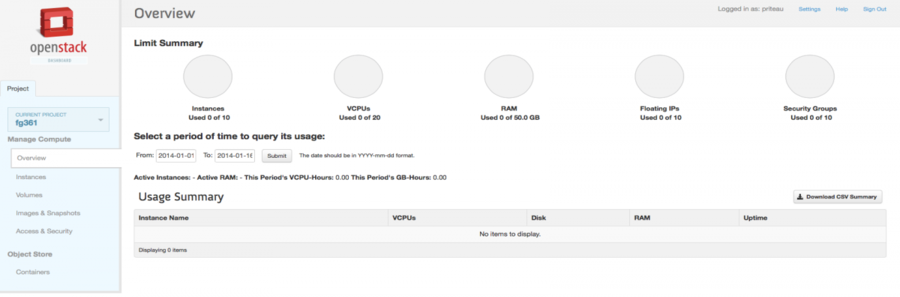
After a successful login, you will see the Overview page as shown below. This page provides a summary of your current and recent usage and provides links to various other pages. Most of the tasks you will perform are done via the menu on the lower left and will be described below. One thing to note is that on the left, your current project is displayed. If you have multiple FutureGrid projects, you can change which of them is your current project. All of the information displayed and actions that you take apply to your current project. So in the screen shot below, the quota and usage apply to the current project you have selected and no information about your other projects is shown.
Managing Virtual Machine Instances
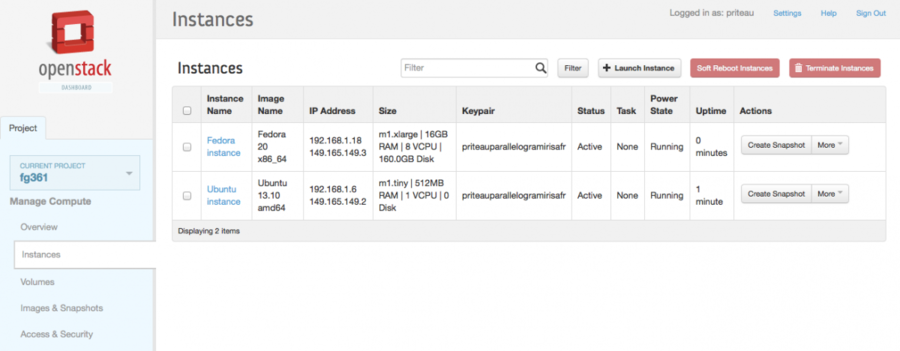
One of the main activities you'll be performing in this web interface is the management of virtual machines, or instances. You do this via the Instances page that is reachable from the menu in the lower left of the Overview page. An example Instances page is shown below. For instances that you have running, you can click on the name of the instance to get more information about it and to access the VNC interface to the console. The dropdown menu to the left of the instance lets you perform a variety of tasks such as suspending, terminating, or rebooting the instance.
The Instances page also lets you create new virtual machines by using the 'Launch Instance' button in the upper-right. When you click this button, a dialog window pops up. In the first 'Details' tab, you select the 'Instance Boot Source' of the instance, which is either an 'Image', a 'Snapshot' (an image created from a running virtual machine), or a 'Volume' (a persistent virtual disk that can be attached to a virtual machine). If you select 'Boot from image', the Image Name dropdown presents a list of virtual machine images that we have provided, that other FutureGrid users have uploaded and made public, or images that you have uploaded for yourself. If you select 'Boot from snapshot', the Instance Snapshot dropdown presents a list of virtual machine images that you have created from your running virtual machines.
On the Details tab, you also provide a name for this instance (to help you identify instances that you are running), and select the amount of resources (Flavor) to allocate to the instance. If you select different flavors from the Flavor dropdown, their characteristics are displayed on the right.
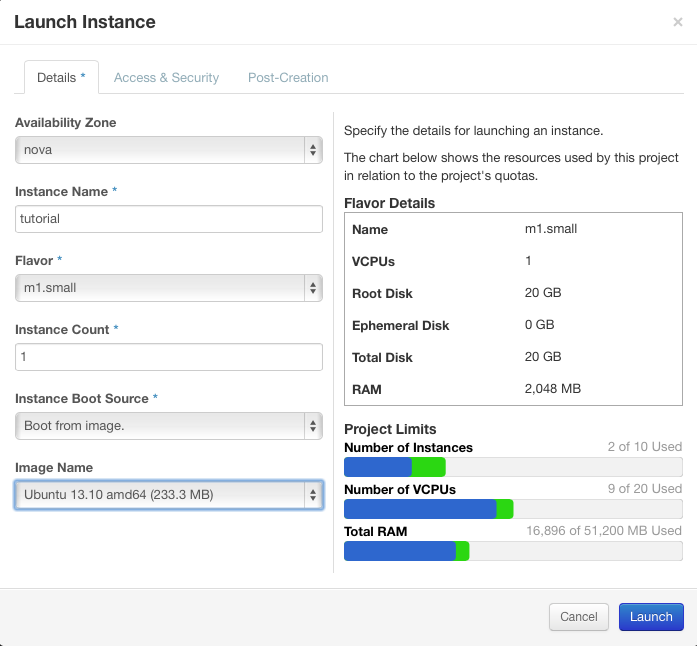
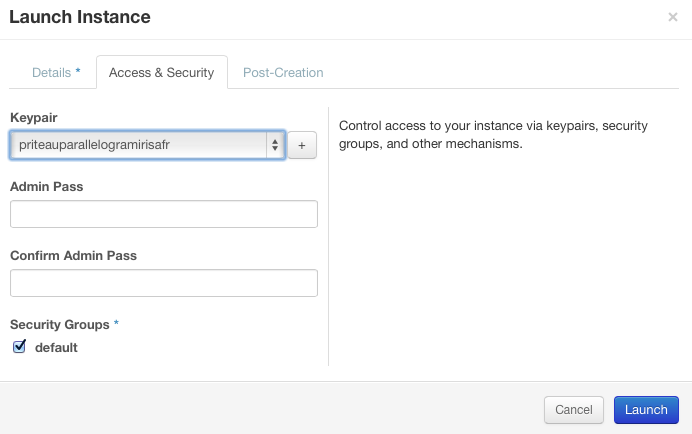
The next tab is 'Access & Security' where you select an ssh keypair that will be inserted into your virtual machine. These keypairs are synchronized with the keypairs you have in the FutureGrid portal and you should manage your keypairs there, rather than in this OpenStack web interface. You will need to select a keypair here to be able to access an instance created from one of the public images FutureGrid provides. These images are not configured with a default root password and you will not be able to login to them without configuring an ssh key.
Once you do this, you can Launch your instance and the Instances page will show progress as it starts.
Snapshots
The instance list page shown above has an option 'Create Snapshot' that allows you to save a copy of the disk contents of a running virtual machine. This allows you to start new virtual machines in the future that are identical to this one and is an easy way to save any changes you make to a running virtual machine.
Floating IP Addresses
To enable more traffic, you need to configure the security group used by your virtual machine. You can see a list of your security groups using the "Access & Security" link on the left.

To edit a security group, click on "Edit Rules". This opens a page showing the existing rules in the security group.

Then, click on "Add Rule" and enter the protocol (by default TCP) and the port number that you want to authorize. Finally, click on Add to save the new rule. Modifications are automatically propagated to the OpenStack cloud.

Accessing Your Virtual Machine
There are two ways you can access your virtual machine. One way is you can access the console using Virtual Network Computing (VNC) in the OpenStack web interface. If you navigate to the Instances page using the left menu and select your instance, you will see a tab VNC that has this console.The second way is via ssh. When you created your virtual machine, you specified an ssh key to load in to the VM. OpenStack injects this ssh key into the VM and you can use the corresponding private ssh key to login to the VM. You will need to use the public IP assigned to your VM to connect from outside of the Hotel cluster.
An important note is that many of the images that we provide do not allow you to ssh into the root account. Instead, you ssh into a different account and use passwordless sudo for any administrative tasks. For Ubuntu images, you ssh in to the 'ubuntu' account. For CentOS and Fedora 18 and older Fedora images, you ssh in to the 'ec2-user' and for Fedora 19 and newer, you ssh in to the 'fedora' user.
OpenStack REST Interfaces
The OpenStack REST Interfaces are supported on Hotel over secure HTTP connections. You can download your OpenStack credentials file from the web interface via the "Access & Security" link in the left of any page and then click on the "API Access" link on the top.
The SSL certificate used by OpenStack Hotel is trusted by most operating systems, so you shouldn't have to provide any extra options to OpenStack commands, i.e. "nova list" should work.
If your command-line tool complains about the certificate, download the Mozilla CA bundle from the cURL website and run the OpenStack client tools with the --os-cacert cacert.pem arguments.
EC2 Interface
OpenStack on Hotel supports the EC2 interface for programmatic access. You can download your EC2 credentials from the web interface via the "Access & Security" link in the left of any page and then click on the "API Access" link on the top. You should see a 'Download EC2 Credentials' button on the top-right. Note that you have different EC2 credentials for each FutureGrid project you participate in. If you are a member of multiple FutureGrid projects, we request that you use the corresponding EC2 credentials when starting virtual machines for a project.Note that the S3 interface is not currently available, but you can access the OpenStack Swift object store using the native API.