Virtual Globus
Globus Provision on FutureGrid
Globus provides a provisioning Framework that allows to run Globus on Clouds.
If you have any questions, feel free to contact the FutureGrid at http://archive.futuregrid.org/help.
This documentation was prepared by Andrew Younge and includes much information from the Globus Provisioning project conducted by Borja Sotomajor and the Globus team.
What is Globus Provision?
Globus Provision is a tool for deploying fully-configured Globus systems on Cloud IaaS. For example, you could use Globus Provision to deploy a cluster on FutureGrid with various Globus services, and a Condor pool, installed on it:
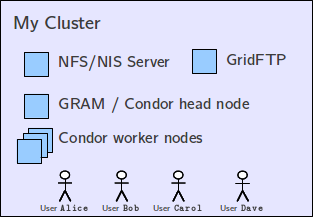
Globus Provision would also take care of setting up a shared NFS filesystem and an NIS authentication domain, and creating user accounts on the cluster. X.509 certificates for the hosts and users are also created automatically. Globus Provision is designed to be easy to use, so deploying the above cluster would basically involve writing the following file:
 [domain-mycluster]
 users: alice bob carol dave
 nfs-nis: yes
 gridftp: yes
 gram: yes
 condor: yes
 condor-nodes: 3
Next, you would just have to run a few simple commands to instruct Globus Provision to deploy this cluster on a FutureGrid cloud. Once the cluster is running, Globus Provision allows you to dynamically add and remove hosts (e.g., to increase the size of the Condor pool) and to add/remove user accounts. You can also shut down your cluster while not in use (to avoid paying Amazon EC2 for resources that are just idling), and resume it at a later time.
Terminology
Topology
Earlier, we said that Globus Provision can deploy fully-configured “Globus systems”. Throughout the documentation, we’ll refer to the specification of such a system as a topology. For example, the “My Cluster” topology includes a GridFTP server, a Condor cluster, four users, etc.
Domains
A topology can be composed of one or more domains. The “My Cluster” topology has a single domain, whereas the “Mini-clusters” topology has multiple domains (one for each mini-cluster). The main distinguishing characteristic of a domain is that it has its own set of users, and that only the users in a given domain will be able to access the resources in that domain.
Host (or Node)
A domain contains one or more hosts (which we will occasionally refer to as nodes). Take into account that, when using the simple configuration file format shown earlier, you don’t specify the domain’s hosts directly (for example, we specified options gram: yes and condor: yes, and Globus Provision allocated a single host for both). Globus Provision’s lower-level interface does allow you to specify each individual host, and what software and services must run in each of them.
Instance
When a topology is actually deployed, we refer to it as a Globus Provision instance. You can think of the topology as the specification of what you want to run, and an instance as the actual running system. Notice how the commands shown above perform operations on your instance: starting it, adding a new host to it, etc.
Defining a simple topology
Globus Provision allows you to deploy fully-configured Globus systems “in the cloud” (more specifically, we will be deploying them on Amazon EC2). The system you deploy could be something as simple as a single GridFTP server, or something as complicated as 20 Condor clusters, each with a GRAM and MyProxy server (e.g., if you were teaching a workshop, and wanted to give each student access to their own cluster to play with).
In Globus Provision lingo, the specification of such a system is called a topology. As you’ll see in the following chapters, Globus Provision allows you to define many aspects of a topology: whether it should have a shared filesystem, what users should be created, whether those users must have X.509 certificates, what software should be installed on each machine, etc.
However, we’ll start with the simplest possible topology: a single GridFTP server with two users (user1 and user2) that are authorized to access that server. We can specify this topology using the following file:
 [general]
 deploy: ec2
 domains: simple

 [domain-simple]
 users: user1 user2
 gridftp: yes
This is an example of Globus Provision’s simple topology file format. It provides a simple and high-level format for specifying topologies. In this particular case, we are doing the following:
We are specifying a single domain called simple. A topology can be divided into multiple domains, each with its own set of users, Globus services, etc. For example, if we wanted to deploy 20 separate Condor clusters (each with its own GRAM and MyProxy server), we would need to define 20 separate domains.
The simple domain is configured to have two users (user1 and user2) and a GridFTP server. The simple topology format is a good way of getting started, but it can be too constrained for more complex topologies. As you’ll see in the following chapters, Globus Provision also provides a much richer and versatile JSON format for specifying topologies (in fact, the simple topology format gets translated internally into the JSON format).
Running Globus on FutureGrid
The topology file shown above specifies that the topology must be deployed using FutureGrid's Eucalyptus cloud (deploy: ec2), so we need to provide some euca parameters that will allow Globus Provision to use your FutureGrid Eucalyptus account to deploy this topology. If you do not already have a Eucalyptus account, please go to [[1]]. More specifically, you will need an Access Key ID and Secret Access Key and an SSH Keypair. We suggest that you create a keypair called gp-key, and save the keypair file as ~/.euca/gp-key.pem, since many of the sample files assume that naming.
You will need to add the following to the topology file:
 [ec2]
 keypair: gp-key
 keyfile: ~/.euca/gp-key.pem
 username: ubuntu
 ami: emi-87A41434
 instance-type: c1.medium
 availability_zone = india
 server-hostname = 149.165.146.135
 server-port = 8773
 server-path = /services/Eucalyptus
Notice how we are telling Globus Provision to use your gp-key keypair, to use c1.medium instances , and to use Globus Provision’s latest 32-bit EMI, along with the necessary pointers to the Eucalyptus Cloud on india. This is an Ubuntu machine image that we provide with many software packages preinstalled, which considerably speeds up the deployment of topologies.
Finally, save the entire topology file (with the [general] and [domain-simple] sections shown earlier and the [ec2] section shown above) as single-gridftp-ec2.conf. You will also need to export your Access Key ID and Secret Key as environment variables AWS_ACCESS_KEY_ID and AWS_SECRET_ACCESS_KEY, respectively. For example:
 export AWS_ACCESS_KEY_ID=FOOBAR123FOOBAR123
 export AWS_SECRET_ACCESS_KEY=FoOBaZ123/FoOBaZ456FoOBaZ789FoOBaZ012FoOBaZ345
If you have your eucalyptus environment properly setup , you may just need to source your ~/.euca/eucarc file in order to ensure this is properly setup.
Creating and launching a Globus Provision instance
Ok, we’re ready to actually launch this topology. The first step is to create a Globus Provision instance with that topology:
gp-instance-create -c single-gridftp-ec2.conf
This should immediately return the following:
Created new instance: gpi-52d4c9ec
The gp-instance-create command doesn’t actually deploy the topology, but simply validates that the topology is correct, and creates an entry for it in a database. This entry is called an instance. You can think of the topology as a specification of what you want to deploy and the instance as one particular deployment of that topology.
To actually launch this instance, we use the gp-instance-start command (make sure you use the identifier returned by gp-instance-create, not the one used in these examples):
gp-instance-start gpi-52d4c9ec
This command will take a few minutes to do its job and, for a while, all you will see is the following:
Starting instance gpi-52d4c9ec...
In a separate console, you can track the progress of the deployment using this command:
gp-instance-describe gpi-52d4c9ec
You should first see something like this:
gpi-52d4c9ec: Starting
 Domain 'simple'
     simple-gridftp  Starting
This command is telling us not just the status of the entire instance (Starting) but also of each individual host in the topology’s domains. In this case, Globus Provision “translated” our topology into a single host called simple-gridftp.
After a while, the output of gp-instance-describe will look like this:
 gpi-52d4c9ec: Configuring

   Domain 'simple'
     simple-gridftp  Configuring  149.165.XX.XX	10.128.XX.XX
At this point, the simple-gridftp host has started, and Globus Provision is in the process of configuring it. Since the host has started, we now know what its actual hostname is. We will use this later to connect to that host.
When gp-instance-start finishes deploying the instance, it will show the following:
 Starting instance gpi-52d4c9ec... done!
 Started instance in 1 minutes and 22 seconds
And gp-instance-describe will look like this:
gpi-52d4c9ec: Running
 Domain 'simple'
     simple-gridftp  Running  149.165.XX.XX	10.128.XX.XX
Now that the instance is running, we are going to connect to the GridFTP server host as one of the users we defined in the topology. When using the simple topology file, your public SSH key will be authorized by default in all the users (in fact, their passwords will be disabled, and using an SSH key will be the only way of logging into the hosts).
So, you should be able to log into the GridFTP host like this (make sure you substitute the hostname with the one returned by gp-instance-describe):
ssh user1@149.165.XX.XX
Once you’ve logged in, you will actually be able to play around with some Globus tools. By default, Globus Provision will create user certificates for all users, which means you should be able to create a proxy certificate by running the following:
grid-proxy-init
You should see the following output:
 Your identity: /O=Grid/OU=Globus Provision (generated)/CN=user1
 Creating proxy ..................................................................... Done
 Your proxy is valid until: Wed Aug 17 04:30:07 2011
Next, you can try doing a simple GridFTP transfer:
globus-url-copy gsiftp://`hostname --fqdn`/etc/hostname ./
Once you’re done, just log out of the host, and terminate your instance like this:
gp-instance-terminate gpi-52d4c9ec
You will see the following:
Terminating instance gpi-52d4c9ec... done!