Web Server Controller
Overview
The Web Server Controller is the control centre for the Zeus
Server. It allows all aspects of the server's
configuration and running status to be configured. A link to the
Controller can be found on the front page of the Zeus Administration
Server. Click on the Web icon to get to the Controller front
page.
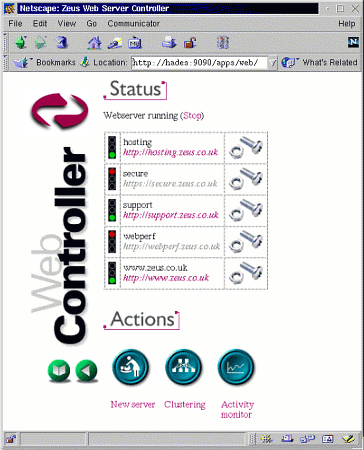
Web Server Controller Layout
The Web Server Controller page is made up of three sections.
- The Navigation section, which tells you where in the admin server you are and provides quick navigation links.
- The Status section, which includes the current web server status and a list of configured virtual servers.
- The Actions section, which allow you to create new virtual servers, and manage multiple machines in the webserver cluster.
Navigation
The Navigation bar is consistent throughout the Admin Server. It provides useful links for navigating around the Admin server.

A link back to the previous configuration page is always present.

Configuration pages have a link back to the Web Server Controller.

A link to the documentation system.
Status
The Status section displays information on the running status of the server process itself and the configured virtual servers. If the webserver is not running, this section contains a link to start the webserver, otherwise, a link will be displayed to stop the webserver.
If you are running more than ten virtual servers, the display changes slightly, to ease the management of many virtual servers. See the section on mass-hosting for more details.
Actions
The two Actions buttons allow new servers to be created and global Web Server settings to be configured.

Create a New Virtual Server 
Clustering 
Activity Monitor
Clustering
Clustering allows multiple machines to seamlessly co-operate to
provide web services. Clustering provides higher scalability,
fault-tolerance and the ability to upgrade/fix your hardware while
your mission critical websites seamlessly continue to function on the
remaining machines.
The clustering status page reports information on all the machines in the webserver cluster. The administration server provides a single mangement interface to multiple machines in a server farm, allowing easy deployment
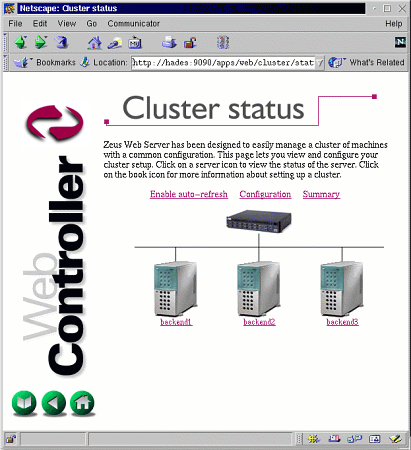
Clicking on the "Configuration" button presents a web-form which allows machines to be added or removed from the cluster.
Clicking on "Enable auto-refresh" provides real-time status information on the machines in the cluster.
See the Introduction to clustering document for more information on clustering and its setup.
Activity Monitor
The activity monitor provides real-time display of the activity of
a single installation of Zeus Server, or a cluster of machines in a
server farm. See the activity monitor
documentation for more information.
Virtual Servers
A virtual server is an encapsulation of a webserver bound to a
specific IP address and port. Zeus Server can host an unlimited
number of virtual servers. At least one virtual server must be
configured for the server to respond to client's requests.
The first time you view the Controller page there will not be any virtual servers configured, but instead a link to create a new server.
Creating a New Virtual Server
New Virtual servers are created by clicking on the Action button
"New server" at the bottom of the Web Server
Controller page. This link will take you to the "Create
New Server" page, where you need to enter some basic details
for the new server.
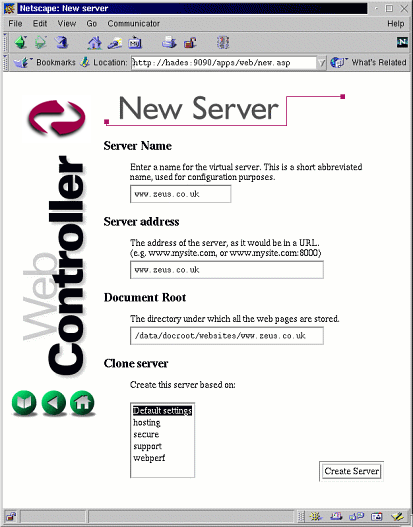
Server Name
The Server Name is a unique name given to each virtual server. The Server Name should be a short, single text string containing no white space. Underscores, minus characters and full stops (periods) can be used as word separators if needed. Domain names make useful Server Names. The Server Name is used solely within the administration system, it is never revealed to the Internet at large.Server URL
The Server URL should be a valid host name for the server machine. If you require the virtual server to run on a port other than port 80, the port number should be appended with a colon ":", (but no spaces) separating it from the hostname.The webserver will bind to the IP address of the hostname entered. If the IP address is dedicated to this virtual server, this virtual server is deemed a 'hardware' virtual server. If the IP address is shared between other virtual servers, it is deemed a 'software' virtual server. When a client makes a request to a 'software' virtual server, the webserver determines which virtual server the client is attempting to send its request to by means of a Host header line in the client's request. If no Host is supplied, the webserver will respond with an error page. Note, the Host header line is a HTTP/1.1 extension; while widely accepted it is not supported by all browsers, especially those of an older vintage.
Document Root
The document root is the directory which contains the web site data files. All files to be access should be stored in, or below this directory.When all the details have been entered click on the "Create Server" button. If successful you will be returned to the Controller page which will now have an entry for the new server. The traffic light will indicated that the server is inactive, you should click on the traffic light to start your new server.

On the controller page, each virtual server is displayed in a table, showing the current status together with links to start/stop the server or configure it. If the server process is not running, then this table will be grayed out and all the links disabled until the server process is started again.
 |
Stopping and Starting virtual servers (The Traffic Lights) |
| Webserver | Virtual server | |
 |
Running | Stopped |
 |
Running | Running |
 |
Stopped | Stopped, was not running previously |
 |
Stopped | Stopped, was running previously |
If the server process is not running, the traffic lights will be grayed out. A grayed out red traffic light indicates that the virtual server was not running when the webserver was stopped, whereas a grayed out green traffic light indicates the virtual server was running when the webserver was stopped. Virtual servers which were running when the webserver was stopped are automatically started again when the webserver is started. This is summarised in the table above.
Virtual server description

The second column displays the virtual server name, along with the URL that the virtual server runs on. Following the virtual server name may be the word (modified) in which case the server configuration has been changed since the server was last restarted. This means that the server may be running with an old configuration. If (modified) is present, starting and stopping the virtual server using the traffic lights will ensure the configuration is up to date.
Modifying a Server (The Nut and Bolt) |
 |
Modifying Virtual Servers
Once the new virtual server has been created you will probably wish to
change some of the default settings. Changes to a virtual server are
performed by clicking on the Nut and Bolt icon.
After clicking on the Nut and Bolt icon, the Edit server page will appear. This page provides links to each of the configuration options for your virtual server. General Configuration, Security Configuration and Module Configuration. More information on these options appears later in the documentation. The final option allows you to delete the virtual server.
Below the circular icons are a set of square icons which represent each extension module. Clicking on one of these links will take you to the configuration page for the module. Extension modules are explained later in the documentation.
General Configuration
Clicking on the General Configuration icon takes you to the
"General Server Configuration" page. From here you can
change the URL and document root details which were entered when the
server was created. There are also configuration options for reverse
DNS lookup and error logging and aliases.
If reverse DNS lookup is enabled, Zeus Server will attempt to obtain the Internet host name of each client machine, from the IP number. This information can then be written to the log files, or used for domain based authentication. However reverse DNS lookup can increase the load on the web server machine slightly, and can be disabled.
Error logging allows you to specify the error log file for the virtual server. If any error information is generated it will be stored in the specified log file. If no log file is specified error information will be sent to the global log file.
Aliases are used to reference an individual virtual server by different host names. Normally, the server will only map requests which have a Host: header which matches the Server URL above. However, an extra list of names can be set to which this virtual server will also respond. This is useful for example if you are running a server say www.transfinite.com, but internally want to be able to access it as http://transfinite/ as well. Here you would add an alias of transfinite to allow the virtual server to respond to this request. Additionally, if you intend to access the virtual server directly by its IP address, you should enter the IP address as an Alias here.
The aliases are seperated by spaces. If a * is set as an alias, then any Host: field that doesn't map onto any of the other soft-virtual servers configured for the same ip-address:port combination will get mapped onto this virtual server. Note, it only makes sense for one of the soft-virtual servers to use the * alias.
Click on the "Update" button to commit your changes to the virtual server settings.
Security Configuration / Enabling SSL
Zeus Server allows each of your virtual servers to
have their own SSL certificates. This allows multiple secure sites to
run on the same Zeus server. Each virtual server requires its own
public and private certificates for secure transfer.
This document only describes the procedures required to enable SSL under on a virtual server. For more information on how SSL works, SSL security precautions and on generating SSL certificates please see the associated documentation.
Secure certificates are added to a virtual server by clicking on the Security Configuration link from the Edit Server page. The page looks like this :
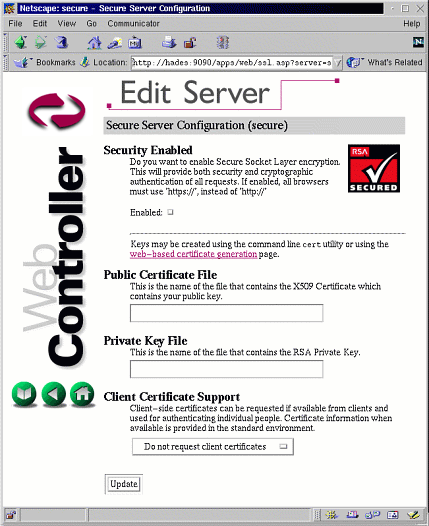
To enable SSL for your virtual server you need to complete the three sections on the Secure Server Configuration page.
Firstly click on the enabled checkbox to turn on SSL. This provides an easy means of turning SSL on and off for the server.
Secondly enter the location of the Public Certificate File. This should be a signed X509 certificate from your Certificate Authority. Enter the full pathname of the file from the servers root directory.
Finally enter the location of the Private Certificate File. This should be your private key from which you generated the certificate request. Enter the full pathname of the file from the servers root directory. Under no circumstances should the private key be stored in the document root of the virtual server.
Click on the Update button to commit the configuration changes and return to the Edit Server page. You will need to restart the virtual server from the Controller to allow the changed to take effect.
Server Ports
The default port for the HTTP protocol (used by web servers) is port 80, the default port for the HTTPS protocol is port 443. It is possible to use any port to run your virtual server by specifying a port number when it is created. If a port number is specified and then SSL is enabled the secure server will continue to run on the specified port. If no port number is specified (the virtual server is running on port 80) then enabling SSL will result in the default HTTPS port being used. It is advisable that all public commercial servers should use the default ports for their protocols.
Software and Hardware virtual servers
SSL enabled servers need to have their own dedicated IP address. Due to limitations in the current SSL protocol, you can not run secure software virtual servers. For more information on the two different types of server see additional documentation.
Zeus Server Modules
When the web server starts a virtual server, it loads a number of
extension modules which are responsible for different aspects of the
server. Each module provides additional functionality to the web
server core. The modular architecture of the Zeus
Server allows its behaviour to be changed or extended easily and
quickly.
Modules can be replaced with newer versions which implement more features, or modules from the Zeus Power Packs which perform additional tasks.
Each module can be enabled, disabled and configured for each virtual server through the Admin Server.
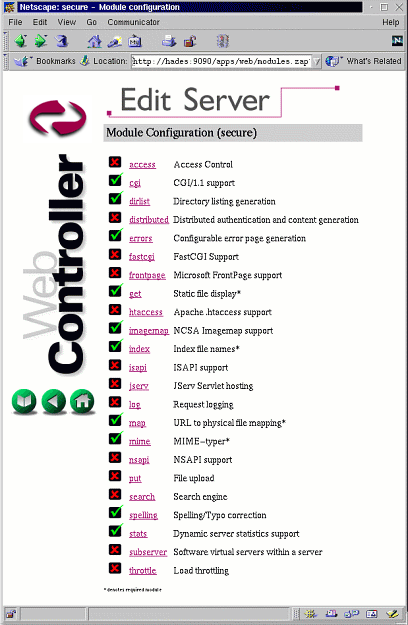
The Module configuration pages are accessed by clicking on the "Module Configuration" link on the Edit Server page. The Module configuration page consists of a list of all modules currently installed, plus status icons denoting if they are enabled for this particular virtual server.
Green ticks indicate that the module is enabled.
Red crosses indicated the module is disabled.
Clicking on the status icons will toggle the module on and off for the virtual server. Clicking on the module name will allow module specific configuration to be entered.
The Module Configuration Page:
Each module has an entry in the documentation system describing in more detail what they do and how to use them.

